admin

Food and Recipes

Backpacking Recipies

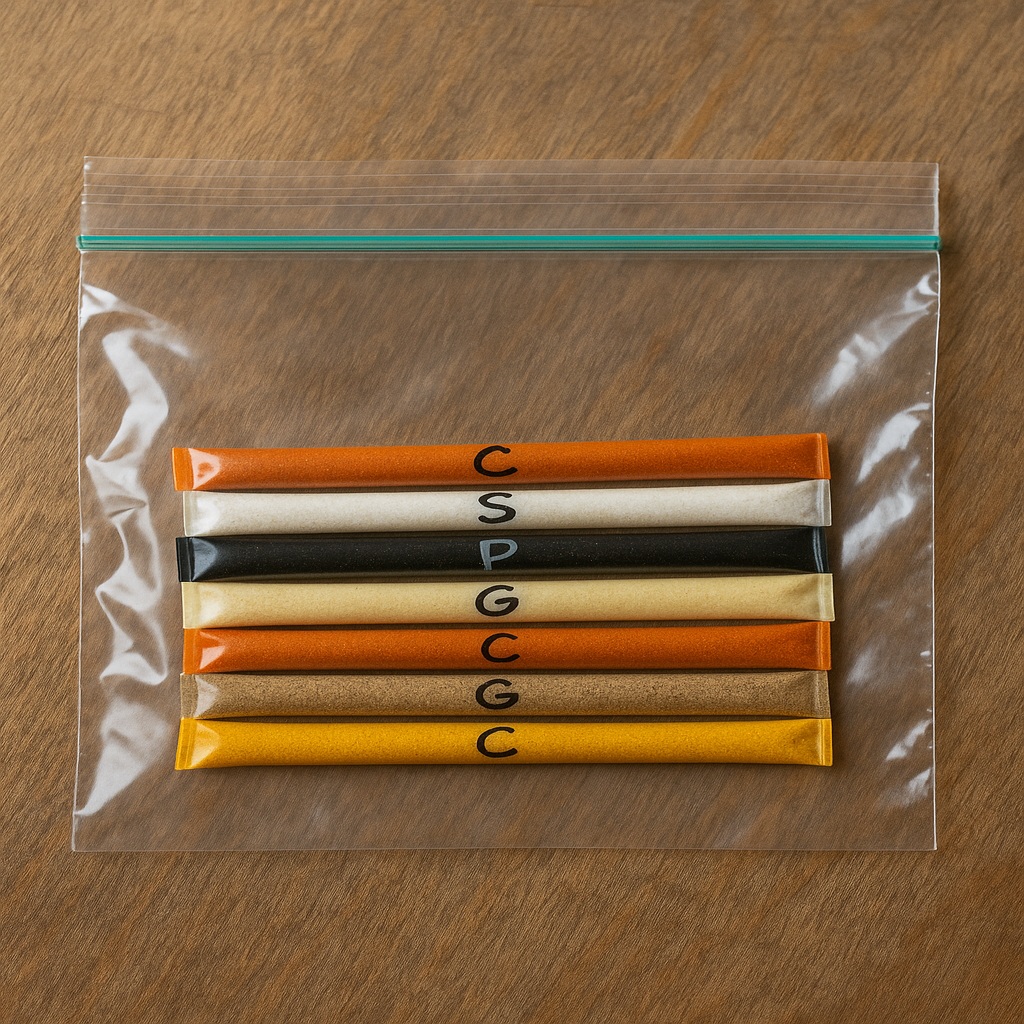
1. Tuna Couscous Bowl Ingredients: 1 pouch (2.6 oz) tuna (any flavor) 1/2 cup instant couscous 1 tbsp olive oil or single-serve packet Salt-free seasoning blend or lemon pepper (optional) Instructions: Boil 2/3 cup water. Stir in couscous and olive oil. Cover and let sit for 5 minutes. Stir in tuna and seasoning. Eat warm or chilled. 2. Ramen Peanut Noodles Ingredients: 1 pack ramen noodles (discard seasoning packet) 1 tbsp peanut butter 1 tbsp soy sauce (or single-serve packet) Red pepper flakes (optional) Instructions: Cook ramen noodles in 2 cups boiling water. Drain most water, stir in peanut butter and soy sauce. Mix until creamy. Sprinkle with chili flakes if desired. 3. Trailside Taco Wrap Ingredients: 1 foil pouch seasoned chicken or beef 2 flour tortillas 1/4 cup instant rice (Minute Rice or similar) Taco seasoning or hot sauce packet Instructions: Rehydrate rice with hot water (cover with boiling water, let sit 5–7 mins). Mix rice with chicken/beef and seasoning. Spoon into tortillas, roll, and enjoy! 4. Lentil Soup in a Mug Ingredients: 1/2 cup instant lentil soup mix (or pre-portioned dehydrated mix) 1 cup water 1 tbsp olive oil or ghee (optional) Crushed crackers or bread cubes (optional topping) Instructions: Add lentil mix to mug or cook pot with water. Bring to a boil, simmer 5–7 minutes until thickened. Stir in oil and top with crushed crackers if you have them. 5. Instant Mashed Potato Bowl Ingredients: 1/2 cup instant mashed potatoes 1/4 cup dehydrated beans or lentils 1 tbsp powdered cheese or nutritional yeast Garlic powder or bouillon cube (optional) Instructions: Add hot water to potatoes and beans (about 3/4–1 cup). Stir until creamy and beans are softened (let sit longer if needed). Mix in cheese powder and seasoning to taste. 6. Cheesy Mac & Peas Ingredients: 1/2 cup instant mac & cheese (dehydrated or box mix) 1/4 cup freeze-dried peas 1 tbsp powdered milk (optional for creaminess) Salt & pepper or garlic powder (optional) Instructions: Boil 1 cup water. Add mac, peas, and powdered milk to pot. Stir and simmer until pasta is soft and cheese is creamy (about 6–8 mins). Season and serve hot. 7. Savory Oats with Veggies Ingredients: 1/2 cup quick oats 1 tbsp nutritional yeast 1/4 cup dehydrated mixed veggies Dash of salt or broth powder (optional) Instructions: Boil 3/4 cup water. Add all ingredients and stir well. Let sit for 5–7 minutes until oats and veggies soften. Enjoy warm, like a trail porridge with a savory twist. 8. Shepherd’s Pie Mash-Up Ingredients: 1/2 cup instant mashed potatoes 1 pouch beef jerky or dehydrated ground beef 1/4 cup dehydrated peas or carrots Gravy packet (optional but tasty!) Instructions: Rehydrate potatoes, beef, and veggies with hot water (about 1 cup). Stir until creamy and hot. Mix in gravy powder if using and enjoy a hearty trail meal. 9. Coconut Curry Rice Ingredients: 1/2 cup instant rice 1 tbsp coconut milk powder 1 tsp curry powder 1/4 cup freeze-dried veggies or lentils (optional) Instructions: Boil 3/4 cup water. Add rice, coconut powder, curry, and veggies. Let sit 8–10 minutes, stir well, and eat hot. 10. Chili Cheese Bowl Ingredients: 1/2 cup dehydrated chili mix (or instant chili beans) 1 tbsp cheese powder or shredded cheese (shelf-stable) Tortilla chips or crackers (for topping) Hot sauce packet (optional) Instructions: Add hot water to chili mix (about 1 cup). Let sit or simmer until thickened. Stir in cheese powder, top with crushed chips, and dig in! All of these recipes are: Lightweight No refrigeration needed Easy to make with just boiling water and one pot Customizable with extra spices, sauces, or dehydrated veggies Packing Tips for Backpacking Meals 🔹 1. Pre-Measure and Pre-Pack Individual Meals Use quart-sized freezer Ziploc bags or reusable silicone bags. Label each meal with a Sharpie (e.g., “Dinner Day 1: Ramen Peanut Noodles”). Include cooking instructions right on the bag with a marker or sticker. 🔹 2. Use Single-Serve Condiments Bring soy sauce, olive oil, peanut butter, and hot sauce in small packets (often found at restaurants or bought in bulk online). Store all condiments in a snack-size bag to avoid leaks. 🔹 3. Pack a Spice Mini-Kit Carry a few spice straws or small containers with essentials: salt, pepper, garlic powder, or curry powder. Film canisters, Tic Tac boxes, or refillable pill organizers work well. 🔹 4. Double-Duty Ingredients Choose ingredients that can be used in multiple meals (e.g., instant rice, olive oil, or freeze-dried veggies). Saves space and weight in your bear bag or food sack. 🔹 5. Use a Collapsible or Lightweight Pot Opt for a Titanium or aluminum pot with a tight lid. A lid that doubles as a strainer can be handy for draining noodles. 🔹 6. Bring a Mug-Style Insulated Container Works great for “re-hydrate and sit” meals like lentil soup or mashed potatoes. Keeps food warm longer and saves fuel. 🔹 7. Consider a Cozied Bag for Soaking Use an insulated cozy or DIY one with bubble wrap or foam to let food cook off-heat. Great for saving fuel when rehydrating lentils, rice, or oats. 🔹 8. Trash Management Always pack a zippered trash bag or a designated stuff sack for used food bags and wrappers. Bring a small odor-resistant bag if you’re hiking in bear country. 🔹 9. Water-Efficient Cooking Choose meals that need minimal water (like instant potatoes or couscous). Bonus: the water used can double as cleanup water if you eat directly from the bag. 🔹 10. Fuel Smart Plan meals that require only boiling water to reduce stove time and fuel use. No-cook or soak-friendly options can help if your fuel runs low.

Food and Recipes

How to Build a Mini Spice Kit

Option 1: Spice Straws (DIY Single-Use Tubes) Lightweight, waterproof, and fun to make! ✂️ You’ll Need: Plastic drinking straws (wide straws like smoothie straws work best) Scissors Lighter or candle Needle-nose pliers or tweezers Small funnel or piece of paper (for pouring spices) 🧪 Steps: Cut the Straw into 2–3 inch sections. Seal One End:  Use pliers to pinch one end closed. Hold that end near a flame (briefly!) until it melts and seals shut. Let it cool completely. Fill with Spice:  Use a mini funnel or folded paper to pour spice into the open end. Don’t overfill—leave about 1/2 inch at the top. Seal the Other End:  Pinch it with pliers and seal using the flame just like before. Label with a Marker (e.g., “C” for Curry, “G” for Garlic, etc.) Store all your spice straws in a small Ziploc bag or mint tin. Option 2: Pill Organizer or Mini Jars 🧪 Supplies: Weekly pill organizer, empty Tic Tac boxes, or mini jars with screw lids Permanent marker or label stickers Small funnel (or paper triangle) 🧂 Steps: Clean and Dry your containers. Add Spices using a funnel. Label each compartment or box. Store the kit in a small mesh bag or zip pouch with your cooking gear. 🌶️ Great Spices to Include: Salt & pepper Garlic powder Onion flakes Curry powder Chili flakes Italian herbs or taco seasoning Cinnamon (for oatmeal!)

Food and Recipes

Campfire Recipes

1. Campfire Skillet Pizza Ingredients: 1 can premade pizza dough (like Pillsbury) 1/2 cup shredded mozzarella cheese Sliced pepperoni (Optional: pizza sauce or tomato paste) Instructions: Lightly oil the cast iron pan and heat it over the fire or stove. Press out the dough to fit the skillet (you may need to use only half the can for one pizza). Cook dough for 2–3 minutes until the bottom starts to brown, then flip. Add cheese and pepperoni (plus a little sauce if using) on the browned side. Cover loosely with foil or lid and cook for another 3–5 minutes until cheese is melted and crust is golden. 2. Beef & Veggie Stir-Fry Ingredients: 1/2 lb shredded cooked beef or beef strips (pre-cooked or vacuum-packed) 2 cups pre-packaged chopped fresh veggies (like stir-fry mix or fajita mix) 1 tbsp oil (olive or sesame) Soy sauce or teriyaki packet (optional) Instructions: Heat oil in cast iron skillet over medium-high heat. Add veggies and cook 5–6 minutes, stirring frequently. Add beef and stir until heated through (another 3–4 minutes). Drizzle with soy or teriyaki sauce, mix well, and serve hot. 3. Grilled Chicken & Cheese Quesadilla Ingredients: 2 flour tortillas 1/2 cup shredded cheese (cheddar or Mexican blend) 1/2 cup cooked grilled chicken (sliced or shredded) Salsa or hot sauce for serving Instructions: Heat cast iron pan and lightly oil it. Lay one tortilla in the skillet. Add cheese and chicken on top. Place the second tortilla over the filling and press gently. Cook for 2–3 minutes until golden, then flip and cook the other side. Slice and serve with salsa. 4. Skillet Sweet Potato & Black Bean Hash Nourishing, fiber-rich, and energizing—great for post-hike recovery! Ingredients: 1 medium sweet potato, peeled and diced (helpful hint: pre cooked saves fuel) 1/2 cup canned black beans (drained and rinsed) 1/4 cup chopped onion or bell pepper (optional) Olive oil + seasoning (salt, pepper, cumin, or taco spice) Instructions: Heat 1 tbsp oil in your cast iron skillet. Add sweet potatoes and cook 8–10 minutes (bring precooked to save fuel), stirring occasionally, until soft and golden. Add onion/pepper and cook 3 more minutes. Stir in black beans and seasonings. Heat through and serve warm—top with avocado or hot sauce if you brought some! 5. Garlic Butter Shrimp with Zucchini Noodles (Zoodles) A light, low-carb dish packed with protein and flavor. Ingredients: 1/2 lb cooked shrimp (peeled & deveined) 1–2 zucchini, spiralized (or bring pre-spiralized zoodles) 1 tbsp garlic butter or mix of butter + minced garlic Lemon wedge or Italian herbs (optional) Instructions: Melt garlic butter in the cast iron skillet over medium heat. Add shrimp and cook for 2–3 minutes until warmed and lightly browned. Toss in zoodles and sauté for another 2 minutes until tender but still crisp. Squeeze lemon or sprinkle herbs if desired. Serve immediately.

Uncategorized

🌿✨ Curious about Forest Bathing? ✨🌿

It’s so interesting… my Hike Leader’s Guide to Forest Bathing has become my best seller on Etsy! 💚 This e-guide is designed for outdoor leaders, educators, and wellness coaches who want to add something deeply meaningful to their hikes. It’s full of practical tips, guided prompts, and easy-to-lead activities that help people slow down, connect with nature, and walk away feeling grounded and refreshed. If you’ve been looking for a way to bring more mindfulness, calm, and connection to your outdoor adventures—this is it. 🍃 Perfect for:✔️ Hiking leaders✔️ Retreat hosts✔️ Yoga and wellness practitioners✔️ Teachers and guides who love the outdoors ➡️ Click the link to see why it’s helping so many people transform their hikes into something magical:🛒 https://justhyke.etsy.com/listing/1801406942 Let nature do the healing. You just need the right tools to guide the way. 💫 #ForestBathing #NatureHeals #JustHyke #MindfulHiking #OutdoorWellness #EtsyFinds #HikingGuide

Uncategorized

Texas Top Ten Campgrounds for Hike and Bike Trails and Amenities

Ready to lace up your boots and hit the trail? Texas has no shortage of amazing places to camp, hike, and recharge in nature—especially for women looking to reconnect with the outdoors. Whether you’re chasing sweeping canyon views, winding bike trails, or a cozy campsite with all the comforts, this list has you covered. Just be sure to check with the park or campground before you go for the latest updates on closures or alerts—because nothing puts a kink in a getaway like a surprise detour! Let’s dive into 10 of the best campgrounds in Texas for adventure, serenity, and everything in between. 🥾 Best for Hiking & Biking Trails 🏕️ Best for Amenities Whether you’re seeking rugged trails or comfortable amenities, these Texas campgrounds offer a variety of experiences to suit your outdoor preferences. 🌲 Melanie Michaelchuk, CPT-NASM | Stretch & Flexibility Coach | Eco-Therapy Guide  | Hiking Enthusiast 🌲 Passionate about helping women over 40 embrace the outdoors and reach new heights, Melanie specializes in fitness training, flexibility coaching, and hiking preparation. Melanie’s goal is to empower others to build strength, confidence, and a love for the trails. For hiking insights, fitness tips, and upcoming events, visit her website: JustHyke and follow along at Melanie Michaelchuk Hiker! Let’s hit the trail together! 🌄 Ready for your adventure? Be travel ready with Global Rescue. Want to get out there but you are concerned about your energy level? Take this free health assessment and learn actionable steps to fill in nutritional gaps and improve your health and fitness. Take Assessment #JustHyke #idlife #womenwhohike #naturelover

Uncategorized

Ready for an Epic Adventure? Houston to New Zealand!

New Zealand’s South Island Is Calling!  10 Day New Zealand Hiking Itinerary If you’ve ever caught yourself daydreaming about packing a bag, lacing up your boots, and heading somewhere wild and beautiful — this is your sign. New Zealand’s South Island is an absolute dream for women who crave fresh air, freedom, and the thrill of exploring somewhere new. Picture crystal-clear lakes, snow-capped mountains, winding trails through ancient forests — and you, right there in the middle of it all. What makes New Zealand such an incredible hiking destination? It’s not just the jaw-dropping scenery (though trust me, that alone is worth the trip). It’s the sense of adventure you feel around every corner. It’s safe, welcoming, and perfect for hikers of all levels. Plus, many of the best trails don’t even require permits, giving you the freedom to chase beauty wherever you find it. The best time to plan your South Island hiking getaway is between November and April — New Zealand’s spring and summer. You’ll find mild weather, longer daylight hours, and trails just begging to be explored. So if you’re ready to step out of your comfort zone, reconnect with your adventurous spirit, and create memories you’ll be proud of — South Island is waiting for you! 🛫 Travel from Houston to New Zealand Flight Route: 🏞️ 10-Day Hiking Itinerary on South Island Day 1: Arrival in Queenstown Day 2: Ben Lomond Track Day 3: Roys Peak Track Day 4: Rob Roy Glacier Track Day 5: Travel to Aoraki/Mount Cook National Park Day 6: Hooker Valley Track Day 7: Sealy Tarns Track Day 8: Travel to Fiordland National Park Day 9: Lake Marian Track Day 10: Return to Queenstown 💰 Estimated Budget (Per Person) Item Estimated Cost (USD) Round-trip Flights $1,200 – $1,800 Accommodation (10 nights) $1,000 – $1,500 Car Rental & Fuel $500 – $700 Food & Dining $400 – $600 Miscellaneous (entrance fees, souvenirs) $200 – $300 Total Estimated Cost $3,300 – $4,900 🏕️ FAQ: Do I Need a Permit to Hike in New Zealand? Q: Do all hikes in New Zealand require a permit?A: Nope! Most day hikes and shorter trails on the South Island (like Hooker Valley, Roys Peak, and Lake Marian) are completely free and don’t require any permits. Q: Which hikes do require permits?A: Some of the famous multi-day “Great Walks” — like the Milford Track, Routeburn Track, and Kepler Track — require advanced bookings and permits through the Department of Conservation (DOC). These permits include your overnight stays in huts or campsites. Q: When should I book if I want to hike a Great Walk?A: As early as possible! Great Walk bookings usually open in late spring (New Zealand time) for the upcoming hiking season. Spots can sell out quickly, especially between November and April. Q: Where do I get a permit?A: You can book online directly through the official DOC website: https://www.doc.govt.nz Q: What if I miss out on a permit?A: No worries! There are dozens of world-class day hikes and overnight hikes that don’t require permits. You’ll still have plenty of epic trails to choose from! 🌲 Melanie Michaelchuk, CPT-NASM | Stretch & Flexibility Coach | Eco-Therapy Guide  | Hiking Enthusiast 🌲 Passionate about helping women over 40 embrace the outdoors and reach new heights, Melanie specializes in fitness training, flexibility coaching, and hiking preparation. Melanie’s goal is to empower others to build strength, confidence, and a love for the trails. For hiking insights, fitness tips, and upcoming events, visit her website: JustHyke and follow along at Melanie Michaelchuk Hiker! Let’s hit the trail together! 🌄 Ready for your adventure? Be travel ready with Global Rescue. Want to get out there but you are concerned about your energy level? Take this free health assessment and learn actionable steps to fill in nutritional gaps and improve your health and fitness. Take Assessment #JustHyke #idlife #womenwhohike #naturelover

Uncategorized

🏔️ Get Strong for Your Next Adventure – At Home or the Gym!

🏔️ Get Strong for Your Next Adventure – At Home or the Gym! Strength Workouts for Hikers: Train Smarter, Hike Stronger Whether you’re dreaming of your first bucket list hike or gearing up for another summit, your training starts long before you hit the trail. One of the best ways to prepare is by building strength and endurance through targeted workouts that mimic real hiking challenges — like uphill climbs, backpack weight, and rocky, uneven terrain. That’s why I created these two simple strength circuits designed specifically for hikers. Each one focuses on key areas: legs, glutes, core, and upper body support. And the best part? You can do them at home or in the gym with minimal equipment — just your body and a resistance band! 💪 Try these two circuits: 🏔️ Workout 1: “Trail Ready Legs & Core” Focus: Lower body power, core stability, and uphill enduranceEquipment: Resistance band (optional), mat Repeat the circuit 2–3x with 30–45 seconds of rest between each round. 🥾 Workout 2: “Backpack Strong & Balanced” Focus: Upper body support, core control, balance under loadEquipment: Resistance band or light backpack, optional mat Repeat the circuit 2–3x with 30–60 seconds rest between rounds. ✨ Encouragement Tip: You don’t need to go fast — you need to be consistent. Add these into your weekly training 2–3 times a week and you’ll feel stronger, more stable, and ready to take on that summit. Repeat each circuit 2–3 times, and you’ve got yourself a hike-specific workout that helps build the strength and stamina you need for your next adventure. 🌿 Remember — strong hikers aren’t born, they’re built. One step, one rep, one climb at a time. 🌲 Melanie Michaelchuk, CPT-NASM | Stretch & Flexibility Coach | Eco-Therapy Guide  | Hiking Enthusiast 🌲 Passionate about helping women over 40 embrace the outdoors and reach new heights, Melanie specializes in fitness training, flexibility coaching, and hiking preparation. Melanie’s goal is to empower others to build strength, confidence, and a love for the trails. For hiking insights, fitness tips, and upcoming events, visit her website: JustHyke and follow along at Melanie Michaelchuk Hiker! Let’s hit the trail together! 🌄 Ready for your adventure? Be travel ready with Global Rescue. Want to get out there but you are concerned about your energy level? Take this free health assessment and learn actionable steps to fill in nutritional gaps and improve your health and fitness. Take Assessment #JustHyke #idlife #womenwhohike #naturelover

Uncategorized

Let’s Talk About Orange Peels. 🍊

Leave No Trace: Hiking with Respect for Nature and Ourselves We go into the wild to find peace, beauty, and sometimes a bit of challenge. But with great adventure comes great responsibility—especially when it comes to protecting the places we love. That’s where Leave No Trace principles come in. Let’s Talk About Orange Peels. 🍊 You might think tossing an orange peel into the woods is harmless. After all, it’s biodegradable, right?Well… not exactly. 🍊 An orange peel can take up to 2 years to decompose in the wild.During that time, it becomes an eyesore for the next hiker, attracts wildlife to human food (a bad habit), and disrupts natural ecosystems. When we throw out food scraps like banana peels, apple cores, or orange rinds, we’re not “feeding the forest”—we’re littering. And Then There’s the Water Issue… Another Leave No Trace principle is “Plan Ahead and Prepare.” And yet, I still see people hit the trail with no water—or one small bottle on a hot, humid Texas day. 🚫 A few examples I’ve witnessed: This isn’t just poor planning—it’s dangerous. Dehydration, fatigue, and heat exhaustion are real risks. And in remote areas, help may be hours away. So, What Does Leave No Trace Actually Mean? Here are the 7 Leave No Trace Principles, simplified: These aren’t just guidelines—they’re a mindset shift. When we hike with intention and awareness, we help protect the trails for future generations. Let’s Be the Kind of Hikers Who Inspire Others. Nature gives us so much—it’s our job to give something back. That means carrying out what we carry in (yes, even peels!), being mindful of our impact, and showing others what good stewardship looks like. 🌿 Want more hiking tips, trail inspiration, and training tools to help you go from Sidewalk to Summit? 👉 Subscribe to Just Hyke for weekly updates, downloadable resources, and adventure motivation.👉 Or go directly to my Just Hyke Shop for gear and training plans! About the Author 🌲 Melanie Michaelchuk, CPT-NASMStretch & Flexibility Coach | Eco-Therapy Guide | Hiking Enthusiast Founder of Just Hyke, Melanie helps women 40+ build strength, confidence, and love for the outdoors through fitness, nature retreats, and empowering hiking adventures. From Kilimanjaro to the Lone Star Trail, she’s on a mission to help others hike strong, stay safe, and thrive in nature. #Hashtags #LeaveNoTrace #HikingTips #JustHyke #WomenWhoHike #TrailEthics #EcoFriendlyAdventure #NatureLovers #SidewalkToSummit #HikingPreparedness #SustainableHiking

Training

Boost Your Cardiovascular Endurance for High-Altitude Hikes (Without Leaving Sea Level!)

Boost Your Cardiovascular Endurance for High-Altitude Hikes (Without Leaving Sea Level!) Are you planning a high-altitude hike or training for a bucket-list trek that’s going to push your limits? Or maybe you just want to improve your cardiovascular endurance so you can actually enjoy your hiking adventures—without getting winded after the first hill. If that’s you, I’ve got a game-changing resource to share. I’ve personally used the Sports Performance course from Oxygen Advantage, and it’s made a noticeable difference in how I perform on the trail—especially at elevation. This course includes high-altitude simulation breathing techniques that help train your body to use oxygen more efficiently. And the best part? You don’t need a mountain to train on. These techniques can be practiced anywhere—at home, at the gym, or even during your walks. Why I Recommend It: Over the years, I’ve trained for some challenging summits, and let me tell you—oxygen efficiency matters. When you’re climbing higher and the air gets thinner, your body has to work harder. That’s where the Oxygen Advantage techniques come in. I’ve used them to: Whether you’re prepping for your next summit or simply want to feel stronger and more capable on every hike, this course is worth looking into. 👉 Check it out here: Oxygen Advantage Sports Performance Course Happy hiking and strong breathing,Melanie Michaelchuk, CPT-NASMCoach • Hiker • Nature Lover

Training

Proprioception: The Hidden Superpower for Hikers and Longevity (Especially for Women)

Have you ever stumbled on a root during a hike, caught yourself just in time, and kept moving like nothing happened? That moment of graceful recovery? You can thank proprioception — your body’s hidden superpower. Proprioception is your body’s ability to sense its position, movement, and balance in space without needing to look. It’s your internal GPS, letting you know where your limbs are and how to move them — even in the dark, on rocky terrain, or when fatigue sets in. For hikers, especially women navigating summit paths, proprioception plays a crucial role not just in performance, but in safety and long-term joint health. Why Proprioception Matters for Hiking & Longevity Women vs. Men: Is There a Difference? Yes — and it matters on the trail. Women often have a wider pelvis and different Q-angle (the angle at which the femur meets the tibia), which can influence knee tracking and balance. Hormonal fluctuations also affect joint stability, making proprioceptive training even more vital for women. Men tend to have more muscle mass and may naturally rely more on strength than balance. While this doesn’t make men immune to injury, it often means women need to focus more on joint stability and neuromuscular control to stay strong and safe on the trail. 3 Real-World Hiking Moments Where Proprioception Saves the Day 7 Exercises to Improve Proprioception for Hikers You don’t need fancy equipment. Most of these can be done at home or on a trail! Why It’s Especially Helpful for Women Hiking Up (and Down) a Summit Summit hikes challenge every part of your body. Uphill climbs require strength and coordination. Downhill descents are notorious for knee strain and slipping risks. Proprioceptive training prepares your body for both: For women, this means protecting the knees (a common weak point), improving balance, and building confidence in every step. It’s not just about reaching the summit — it’s about doing it safely, repeatedly, and well into your 60s, 70s, and beyond. Final Thought Proprioception isn’t something we talk about enough, but it’s one of the most important systems to train if you want to stay active and injury-free as you age. Whether you’re hiking your first hill or prepping for a mountain summit, building proprioception is like sharpening your instincts. So next time you’re out on the trail, thank your body for its quiet genius. And if it needs a little help? Give it the training it deserves. From the sidewalk to the summit — your journey begins with balance.

Scroll to Top